Introduction:
Helm is a package manager for Kubernetes, like other package managers such as apt, yum, and rpm. It simplifies the deployment and management of applications in Kubernetes environments by providing a centralized repository of secure and official packages. With Helm, users can easily install a variety of ready-to-use software packages, including web servers, databases, and more. Its package management capabilities streamline the process of installing, upgrading, and removing applications, making it an essential tool for Kubernetes administrators and developers.
Why We Use Helm?
Imagine you're working on a large microservices project destined for a Kubernetes cluster deployment. Each microservice requires its own set of YAML files for manifests, such as pods, services, ingress, deployment, and namespaces. With just 10 microservices, that's already a significant number of files to write and manage. Moreover, if there's a configuration change, you'd need to update each corresponding manifest file, which can quickly become cumbersome. Enter Helm, simplifying this process by allowing you to package all these manifests into a single directory. With Helm, you can manage all configurations and pass required values directly from another YAML file. This means you only have to manage a single YAML file instead of juggling numerous YAML files for each microservice. Helm streamlines the deployment process, making it more efficient and manageable, especially in large-scale projects.
How Helm Works?
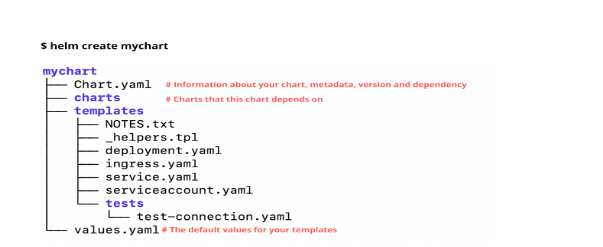
As we have explained, Helm packages all the YAML files in one directory, which we call charts. Below is the structure of Helm and its naming convention:
Let’s Deploy Our First Helm Chart:
Prerequisites:
- A Kubernetes cluster is up and running.
- GitHub account and basic understanding of GitHub actions.
- Terminal/cmd with installed Helm.
Step 1: Installation of Helm
Visit the below link and install Helm on the terminal according to your OS and specifications - https://helm.sh/docs/intro/install/
Step 2: Checking Setup After installing
Helm, check if it is installed correctly by running the helm version command. Also, check if your Kubernetes cluster is working fine by using the kubectl get pods command. As we currently don't have any pod running, it gives output like No resources found.
Step 3: Understand Our First Helm Chart
Need help with your cloud infrastructure?
Our experts at CloudZenia are ready to help you build, scale, and secure your setup.
Book a Free ConsultationVisit the below URL and clone the repo: https://github.com/Ghaterishi/helm-aks Your repository consists of two main folders:
- .github : This folder contains our deployment instructions written in YAML configuration files. Here, we utilize GitHub Actions runners and define steps for our deployment process. Whenever there is a change inside our hello-world directory, our GitHub Action pipeline automatically triggers and performs steps written in the main.yml file.
- hello-world : This directory hosts our Helm chart in Kubernetes, structured similarly to the image provided above. Within this directory, there's no "chart" folder as our chart doesn't depend on any other charts. Instead, you'll find:
- templates : All YAML files related to our Kubernetes deployment reside here.
- values.yaml : This file serves as the central location for passing values to Kubernetes YAML files stored in the templates folder. This setup enables a streamlined deployment process, allowing us to manage our Kubernetes deployments efficiently and effectively using Helm Kubernetes and GitHub Actions.
Step 4: Adding kubernetes config to Github Action secret
Go to your terminal, run the command cat .kube/config, and copy the whole output. Then go to GitHub, open your clone repo, click on Setting, then Secrets and variable, then Actions and add a new repository secret.
Step 5: Installing our first Helm chart on the Kubernetes cluster
Open the values.yml and make a simple change; your action will automatically trigger and wait for the completion. After completion, go to your terminal and check the deployment. After successful deployment access, the deployment via browser. Don't forget to allow nodeport inside your security group. Access URL: http://<node-ip>:<nodeport>

Step 6: Checking the GitHub Action Pipeline Running File
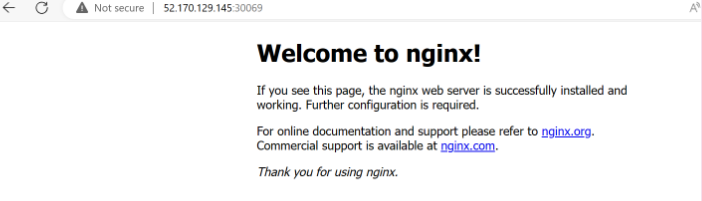
Now let's update the image section inside values.yml; now the value is httpd, which means we are deploying httpd image. Let’s deploy nginx. After successful deployment, once again, go to the terminal to check if the pod and services are running fine, your old deployment will automatically update with the new one. Look at the nodeport - it's unchanged, just refresh the browser, and you can see the nginx webpage.
Disclaimer :
The above demonstration illustrates how Helm can streamline Kubernetes deployments. In this demo, we utilized prebuilt Helm charts in Kubernetes and directly pulled images from DockerHub. However, in practical scenarios, we often build our application images and store them securely. This requires additional configurations, such as updating image pull secrets in Kubernetes YAML files or directly from the values.yaml file in Helm charts. This demo serves as an introduction to what is Helm in Kubernetes and its usage. For a deeper dive into Helm and best practices, we recommend visiting the following URL - https://jhooq.com/getting-start-with-helm-chart/
Conclusion:
In this blog, we've explored what Helm is and its significance in Kubernetes deployments, breaking down complex concepts into simple, understandable terms. To truly master Helm, we encourage you to get hands-on experience by building your custom charts and deploying them in a Kubernetes cluster. This practical approach will deepen your understanding of Helm's key concepts and functionalities, empowering you to effectively manage and streamline your Kubernetes deployments. For more such information and know-how-to blogs, visit our CloudZenia website.

Rushikesh Ghate Linkedin Mar 12, 2024
Filed under