INTRODUCTION ECS is a managed container orchestration service on AWS that helps us easily deploy, manage, and scale containerized applications. It's quite popular due to its comparative ease of setup and operation. If you want to read more about ECS please follow this blog. The ABCs of AWS ECS: Foundation of Elastic Container Services While setting up ECS is straightforward, configuring it for production use requires consideration of several factors, such as scalability, security, and cost optimization. Although other aspects are also important for a production-grade system, this blog will primarily focus on setting up ECS with security best practices. We will explore how to configure ECS in a private subnet, which can use a VPC endpoint to fetch images from ECR without the need for a NAT Gateway. Our primary focus will be to prevent AWS services traffic (such as S3 and ECR) from traversing the internet. By doing this, we not only save on data transfer costs but also keep the traffic private within the AWS network. Let's start now.

Let's talk about deploying your application on an ECS that's situated within a private subnet, and interestingly, it doesn't use a NAT Gateway. You might be curious: how does the ECS task pull images then? Well, AWS offers a clever solution called a VPC endpoint . This tool is specifically engineered for securely accessing AWS services within your account. The key advantage here is that your requests don't travel over the internet. Instead, they stay within the AWS network, ensuring a higher level of security and efficiency. There are two types of endpoints:
- Gateway Endpoint : These endpoints allow your VPC to access AWS services using a direct route within the AWS network. Currently, only two services can support this type, which are S3 and DynamoDB.
- Interface Endpoint : These endpoints are used to connect your VPC to AWS services that are outside of your VPC by creating an Elastic Network Interface (ENI) in your VPC. Most AWS services support this endpoint.
Architecture Diagram: An architecture diagram is an easy way to understand the setup in the cloud. Let's take a closer look at ours. It illustrates how a VPC endpoint acts as a secure bridge linking the ECS task in a private subnet directly to the ECR. This direct connection bypasses the need for internet access, keeping your deployment secure and contained within the AWS environment.
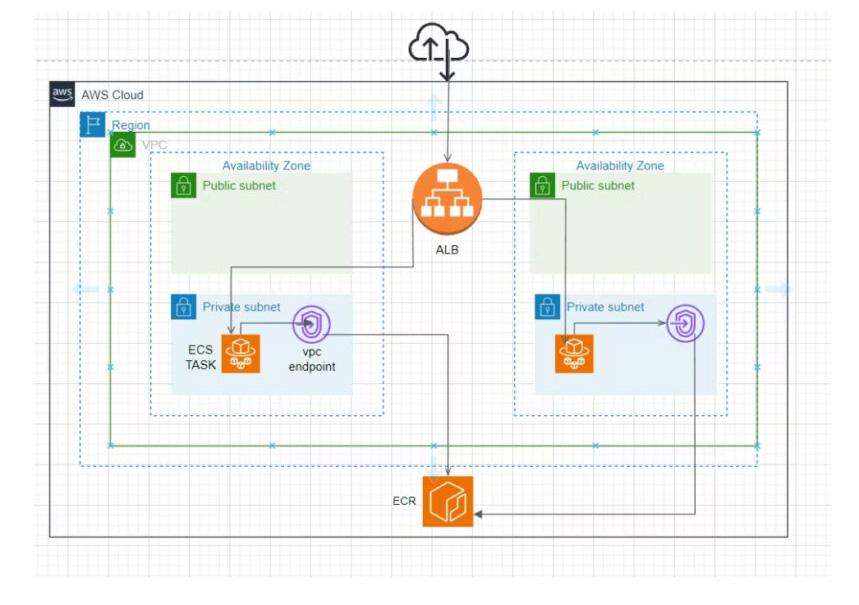
It's clear from the diagram that the ECS tasks are not exposed to the public internet, and the VPC endpoint facilitates a safe and private exchange between ECS and ECR.
Deploy a sample node app on ECS Now the fun part using our theory knowledge let’s apply in a real world project, here we are going to first containerize a Node application and then deploy it to AWS ECS with the way we have talked about above. Let’s see how we can achieve that. I would recommend you to first read and then try to follow the steps on your own.
Step 1: Build a Docker image The first step is going to be to have a docker image of our application. We are going to build the docker image from a sample node application. You can find it in the GitHub link. Link : https://github.com/Ghaterishi/node-todo-cicd If you are new to docker and want to see how to build a docker image. Please refer to the below blog post How to build docker image
Step 2: Create a Private ECR registry Follow the steps to create your ECR repository -
- Login to your AWS account and search ECR.
- You will be presented with the ECR console.
- Click on repository and then create a repository.
- Provide it a name and click create
Step 3: Push docker image to ECR To push an image to ECR repo from local, first we need to configure AWS CLI with proper access to ECR
- Configure the AWS CLI
- Run the aws ecr login command. <>
Step 4: Setup the VPC If you don’t have one already.
- Create two AZs,
- Two public subnets,
- Two private subnets, and in the NAT gateway option choose none.
Step 5: Associate the required VPC Endpoint to the Private subnet
- Click on the endpoints option available on the left side panel of the VPC homepage, you will see the s3 gateway endpoint is already created and associated with your newly created VPC. For existing VPC you will need to create the S3 endpoint that should be the exact same way of creating ECR endpoint.
- Click on Create Endpoint, give a name to your endpoint, and under the service category, choose AWS services.
- In services, search for ECR and choose com.amazonaws.us-east-1.ecr.api, then select VPC, then tick on each subnet AZS checkbox and select private subnet.
- In the security group section, select the securities that are used by your ECS tasks, in the above-presented case, we are using the default one. After all the configuration, click on Create endpoint.
Need help with your cloud infrastructure?
Our experts at CloudZenia are ready to help you build, scale, and secure your setup.
Book a Free ConsultationFollow the same procedure as mentioned above and create two more endpoints:
- com.amazonaws.us-east-1.ecr.dkr
- com.amazonaws.us-east-1.ecr.logs
Step 6: Create a cluster and Task definition
- Go to the ECS homepage and click on the create a cluster option
- Choose cluster launch type as Farget.
- Create a task definition, fill in the mandatory details like a family name, CPU, memory, launch type, and container port, and the Image URI specifies the URI of the image that we push in ECR.
Step 7: Create a Load Balancer and Target Group
- First, create a target group, choose the target type as the IP address
- Configure the remaining details
- Create an application load balancer with listener HTTP 80 and forward that traffic to the created target group.
In creating the load balancer, choose VPC and the public subnet which we have already created.
Step 8: Create an ECS service and attach a load balancer to it
- Open the ECS homepage and click on the cluster created in Step 5, scroll up and click on Create service, and fill in the details,
- In the Family, choose the previously created task definition, fill in the service name,
- In the desired task as 2, open networking and select VPC and private subnet,
- Open the load balancing section and attach the previously created load balancer and target group.
Step 9: Access the app
- It will take around 10 minutes to create a service.
- Once created, click on the service name
- Go to the networking section and copy the load balancer DNS
- Paste it into the browser, and boom..!
Yaaeee!! You have successfully deployed your application using ECR!!!
Troubleshooting ECS Service If your ECS service is provisioning and deprovisioning the tasks or draining your task container, then maybe it is the issue of health check or status code. You may check at what endpoint your app is sending the health check response. Configure the target group according to that. If you are not able to solve this issue, we are happy to help at CloudZenia. Please send us a message, email. One of our engineers will help you troubleshoot this.
Conclusion This was pretty much it, we covered a lot from knowing what ECS is, how it works, some key components with cool diagrams, and how to deploy our application securely with some best industry standard practices. We encourage you to try this on your own. If you end up with errors, try to troubleshoot them. As you troubleshoot the errors, you will learn more. You did great! Happy Learning!


Ghate Rushikesh Linkedin Nov 20, 2023
Filed under