
Introduction As we all know, Kubernetes is a master of container orchestration. It manages your cluster, scales the containers as per your requirements, ensures your cluster's security, and handles your workload efficiently. You might already be familiar with the resources and controllers in Kubernetes, such as the smallest resource, Pod, followed by ReplicaSet, Deployment, and many more. In this blog, we will learn about a special Kubernetes controller called DaemonSet—what it is and how to use it.
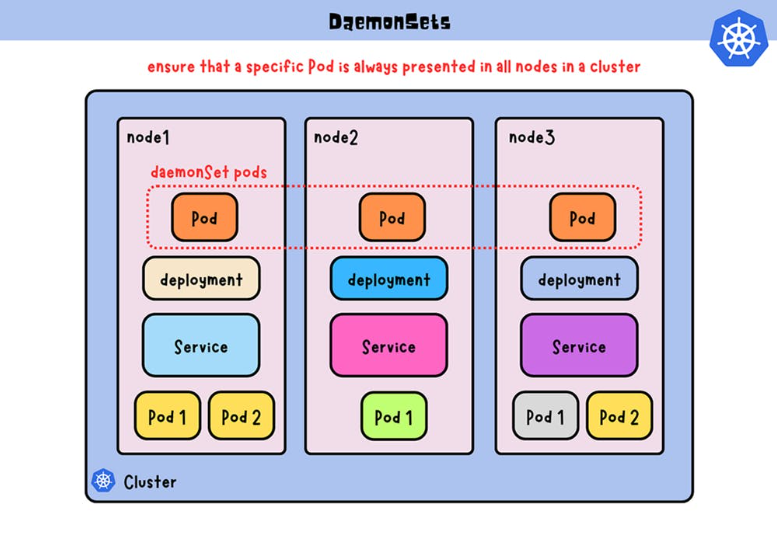
What is Daemonset in Kubernetes? In the Kubernetes ecosystem, a DaemonSet plays a crucial role in ensuring that a specific pod runs on all (or a subset of) nodes within a cluster. Unlike other controllers, such as Deployments or ReplicaSets, which maintain a desired number of replicas across the entire cluster, DaemonSets specifically focus on running at least one instance of a pod on each node. This makes the Kubernetes DaemonSets particularly well-suited for deploying background services, agents, or system-level tasks that need to be present on every node. Let's illustrate this concept with a simple scenario. Imagine you have a Kubernetes cluster with one master node and two worker nodes. You've created a sample Deployment file that deploys two pods. The Deployment interacts with a ReplicaSet, ensuring that two pods are running in the cluster at all times. However, the ReplicaSet doesn't prioritize the nodes on which these pods should be scheduled. It might deploy both pods on the same node or a single pod on each node. In contrast, a DaemonSet is designed to address this limitation. If you were to create Daemonset Kubernetes instead, it would ensure that at least one instance of the specified pod runs on each node in the cluster, offering a more node-centric approach to deployment.
When to Use Daemonset?
1. Monitoring and Logging You have a cluster with many nodes, and you have to monitor all the nodes and pods scheduled on that node. Here, you need a pod of monitoring services like Fluentd, Newrelic, Datadog, Prometheus, etc., running on every node.
2. Network Plugins Networking components, such as CNI (Container Network Interface) plugins, often use DaemonSets to ensure that the required networking components are available on each node. This is crucial for maintaining network connectivity and facilitating communication between containers across the cluster.
3. Security Agents Security-related tasks, such as antivirus or intrusion detection agents, can be deployed using DaemonSets. This approach ensures that security measures are consistently applied across the entire cluster, enhancing the overall security posture.
4. Custom Controllers DaemonSets provide a foundation for custom controllers that need to operate on a per-node basis. This flexibility allows developers to implement specialized controllers tailored to their unique requirements.
Bonus Topic: Introduction to kOps Kubernetes provides excellent container orchestration, but setting up a Kubernetes cluster from scratch can be painful. One solution is to use Kubernetes Operations or kOps. kOps is an open-source project which helps you create, destroy, upgrade, and maintain a highly available, production-grade Kubernetes cluster. Depending on the requirement, kOps clusters can also provision cloud infrastructure. kOps is mostly used in deploying AWS and GCE Kubernetes clusters; behind the scenes, kOps uses Terraform to provision the resources. Want to dive deep into kOps? Visit the below link: kOps Documentation
Let's Learn about Daemonsets by Getting Hands-On Experience
- Create an IAM Role for kOps and Attach the Required Policies: First, create the IAM Role for kOps and generate access keys. Then attach the below policies: AmazonEC2FullAccess, AmazonRoute53FullAccess, AmazonS3FullAccess, IAMFullAccess, AmazonVPCFullAccess, AmazonSQSFullAccess, AmazonEventBridgeFullAccess
- Launch One EC2 Instance for Setting Up the kOps Cluster: Create one instance of size t2.micro with an Ubuntu image and connect with it using SSH.
- Configure the Required Details for the kOps Cluster: After logging into the anchor instance, create one file named install-kops.sh and copy the below code and paste it into the created file. Remember to give it executable permission. ### Start of code ### #!/bin/bash echo "Enter AWS Access Key:" read awsaccess echo "Enter AWS Secret Key:" read awssecret echo "Enter Cluster Name: (ex: my-kube.k8s.local)" read clname echo "Enter an AZ for the cluster:" read az sudo apt update # download kubectl; give execute permission; move to binary path curl -LO https://storage.googleapis.com/kubernetes-release/release/v1.25.0/bin/linux/amd64/kubectl chmod +x ./kubectl sudo mv ./kubectl /usr/local/bin/kubectl # download kOps sudo curl -LO https://github.com/kubernetes/kops/releases/download/v1.25.0/kops-linux-amd64 # Give executable permission to the downloaded kOps file and move it to binary path sudo chmod +x kops-linux-amd64 sudo mv kops-linux-amd64 /usr/local/bin/kops # Configure your AWS user profile aws configure set aws_access_key_id $awsaccess aws configure set aws_secret_access_key $awssecret # Create a key which can be used by kOps for cluster login ssh-keygen -N "" -f $HOME/.ssh/id_rsa # Create an S3 Bucket where kOps will save all the cluster's state information. aws s3 mb s3://$clname # Expose the s3 bucket as environment variables. export KOPS_STATE_STORE=s3://$clname # Create the cluster with 2 worker nodes. kops create cluster --node-count=2 --master-size="t3.medium" --node-size="t3.medium" --master-volume size=30 --node-volume-size=30 --zones=$az --name $clname # Apply the specified cluster specifications to the cluster kops get cluster kops update cluster $clname --yes # The .bashrc file is a script file that’s executed when a user logs in. echo "export KOPS_STATE_STORE=s3://$clname" >> .bashrc ### End of code ###
- Fill in the Required Inputs: After executing this, it will ask for inputs like your AWS access and secret keys, cluster name, and bucket name. While specifying the cluster name, keep in mind that it ends with .k8s.cluster. This is an important step; do check the below gif if you are stuck at this step:
•
- Validate Our Instances: Go to the AWS EC2 dashboard and confirm that the master node + 2 worker nodes exist. Run the below command to get the cluster-info kops get cluster
Need help with your cloud infrastructure?
Our experts at CloudZenia are ready to help you build, scale, and secure your setup.
Book a Free Consultation- Update the kubeconfig File for the kubectl Utility: kops export kubecfg --admin kubectl get nodes
- Instance IDs: The kubectl get nodes command gives the instance ID of the master and worker instances.
- Deploy the Sample Pod: Create one pod.yml file using the below snippet and deploy the pod using: kubectl apply -f pod.yml apiVersion: v1 kind: Pod metadata: name: 2048-pod labels: app: 2048-ws spec: containers: - name: 2048-container image: blackicebird/2048 ports: - containerPort: 80
- Create a Load Balancer Service to Expose the Deployment to the Internet: Create one file called game-svc.yml with the below snippet and run: kubectl apply -f game-svc.yml apiVersion: v1 kind: Service metadata: name: game-svc spec: selector: app: 2048-ws ports: - protocol: TCP port: 80 targetPort: 80 type: LoadBalancer
- Access the Pod Using Load Balancer DNS: Run the below command, copy the load balancer IP, paste it into the browser and boom! kubectl describe svc
The DNS Output will Look Like This:

•
- Heading Towards Daemonset: All the above steps are for the setup of the kOps cluster on AWS and ensuring all the configurations are correct and running smoothly. Now, we have to monitor this pod, but we don't need to check on which node the pod is running. When you check, you will find that the pod is running on one single node, but what if we have 100s of pods running on different nodes? Though we need to deploy a monitoring pod on each node, what if, in the future, we need to add more nodes or terminate the nodes; doing all this stuff manually is hectic, isn't it? Now let's create a Daemonset Kubernetes pod using a fluentd image, fluentd is a monitoring agent, and try to apply it. apiVersion: apps/v1 kind: DaemonSet metadata: name: fluentd-daemonset labels: app: fluentd spec: selector: matchLabels: app: fluentd template: metadata: labels: app: fluentd spec: containers: - name: fluentd image: fluent/fluentd:v1.12-debian-1 resources: limits: memory: 200Mi cpu: 100m volumeMounts: - name: varlog mountPath: /var/log volumes: - name: varlog hostPath: path: /var/log
- Checking The Daemonset Pods Running on Both Nodes: Create the Daemonset pod using the above snippet and deploy using: kubectl apply -f Daemonset.yml Now run the below command and check the output. You will find the pod is running on both nodes; note the IP address of the node: kubectl get pods -o wide
- Check if Daemonset will Schedule The fluentd Pod on The Third Node: Let's create one more node and check if Kubernetes Daemonset will schedule the fluentd pod on the third node by running the below command. kops get ig #note the name of node instancegroup(ig) kops edit ig <node-ig-name> #above command open the ig file in the editor just change the value of maxsize and minsize to 3
- It Would Look Like The Following: # Please edit the object below. Lines beginning with a '#' will be ignored, # and an empty file will abort the edit. If an error occurs while saving this file will be # reopened with the relevant failures. apiVersion: kops.k8s.io/v1alpha2 kind: InstanceGroup metadata: creationTimestamp: "2024-01-18T07:13:25Z" labels: kops.k8s.io/cluster: test-kops.k8s.local name: nodes-us-east-2a spec: image: 099720109477/ubuntu/images/hvm-ssd/ubuntu-focal-20.04-amd64-server-20231208 instanceMetadata: httpPutResponseHopLimit: 1 httpTokens: required machineType: t2.micro maxSize: 3 minSize: 3 role: Node rootVolumeSize: 30 subnets: - us-east-2a
- Update The kOps Cluster: After updating the ig, we need to apply those changes using the below command: kops update cluster #this gives you what is being to update kops update cluster --yes
- Recheck The Pods: After this, wait for 5 min and run the kubectl get nodes command, you will see the 3 working nodes and 1 master node. To check the pods again, run the kubectl get pods -o wide command, and you will see 3 fluentd pods running on each node, including the newly created one. This all is taken care of by Daemonset.
- Clean Up The Resources: Clean up all the resources created in the task using the below command: kubectl delete -f game-svc.yaml kubectl delete -f 2048-pod.yaml kops delete cluster --name=test-kops.k8s.local--yes delete the S3 bucket using console
Conclusion Kubernetes DaemonSets play a critical role in ensuring that specific pods are deployed on every node within a cluster, making them an essential tool for managing background services, agents, and other node-specific tasks. By leveraging DaemonSets, organizations can enhance the scalability, reliability, and consistency of their containerized applications. Understanding the capabilities of DaemonSets opens up new possibilities for optimizing and customizing Kubernetes clusters to meet the unique requirements of various workloads. For more such informational and technological blogs, visit our CloudZenia website. Happy Learning!

Ghate Rushikesh Linkedin Feb 07, 2024
Filed under