 Welcome back to our series on Kubernetes!
So today, we’ll step inside the application world of containers and learn to deploy a simple Nginx application using AWS EKS (Elastic Kubernetes Services). Whether you are a die-hard fan of Kubernetes or just starting with containers, this tutorial is for you. So, let’s go step by step for deploying your applications on one of the most demanding cloud platforms.
Steps to Create Your First Deployment in AWS EKS
- Creating Your EKS Cluster
- Deploying the Nginx App
- Accessing Your Nginx App
- Clean UP (Optional)
1. Creating Your EKS Cluster
In the previous blog, we used AWS GUI for EKS deployment, this time we will use the CLI approach.
First things first: Spin up an EKS cluster, essentially creating a little Kubernetes playground in the AWS cloud using the AWS CLI.
Always ensure that eksctl is installed in the cloud shell with the following commands:
curl --silent --location "https://github.com/weaveworks/eksctl/releases/latest/download/eksctl_$(uname -s)_amd64.tar.gz" | tar xz -C /tmp
sudo mv /tmp/eksctl /usr/local/bin
Before we proceed to the depth of how deployment is done, let us clear some of the widely used tools that you will surely come across. In this case, kubectl and eksctl are some of the tools that, in the unique role played, make Kubernetes management even more straightforward, especially in EKS AWS.
Kubectl and eksctl are both CLI tools that talk to the cluster to manage it. Internally, though, they go about it in entirely different ways and at entirely different levels of abstraction.
-
- kubectl: kubectl is the main CLI utility enabling interaction with any Kubernetes cluster. It allows one to perform basic querying for the cluster’s resources, application deployment, and monitoring and management of cluster resources. Kubectl is an active reader and writer of Kubernetes’ API, which is an essential instrument for users to perform daily operational work with their clusters.
-
- eksctl: eksctl is a simple command line utility for creating and managing Kubernetes clusters on AWS EKS. This is, in fact, a higher-level tool than kubectl which deals with easy cluster creation, deletion, and seamless cluster management of EKS. This is going to make cluster-level operations such as scaling, updating, and IAM configuration. By all means, much easier and more intuitive than kubectl has been up until now.
In simple words, with kubectl, you get the control for fine-grained management of Kubernetes components, and with eksctl, you get a friendly way to manage the cluster infrastructure on EKS AWS. So, using both tools in that way makes AWS a platform integrated for managing containerized environments.
Now let’s start creating:
eksctl create cluster --name my-eks-cluster --region us-west-2Or you can deploy with specific configurations of the AWS EKS architecture with the following command:
eksctl create cluster --name my-eks-cluster --version 1.29 --region us-west-2 --nodegroup-name standard-workers --node-type t3.medium --nodes 3 --nodes-min 1 --nodes-max 3 --managedThis command will provision a new AWS EKS cluster named “my-eks-cluster” in the “us-west-2” region. Wait for a while – this process might take a few minutes.
2. Deploying the Nginx App
Proceed to the main task: deploying the Nginx application. This will require utilizing Kubernetes Deployment and Service. Begin by creating a file named “nginx-deployment.yaml” and populate it with the specified content:
apiVersion: apps/v1
kind: Deployment
metadata:
  name: nginx-deployment
spec:
  replicas: 2
  selector:
    matchLabels:
      app: nginx
  template:
    metadata:
      labels:
        app: nginx
    spec:
      containers:
      - name: nginx
        image: nginx:latest
        ports:
        - containerPort: 80
This YAML file defines a Kubernetes Deployment named “nginx-deployment”. It is configured to create two replicas of the app “nginx”. The deployment uses a selector to manage pods labeled with “app: nginx“. Each pod follows a template that includes a single container running the “nginx” image, which listens on port 80.
Also, make another file for the “LoadBalancer” service, and name it “nginx-service.yaml“
apiVersion: v1
kind: Service
metadata:
  name: nginx-service
spec:
  type: LoadBalancer
  selector:
    app: nginx
  ports:
   - port: 80
     targetPort: 80
This YAML file defines a Kubernetes Service named “nginx-service” of type LoadBalancer. It targets pods with the label “app: nginx” for traffic routing. The service externally exposes port 80, which is mapped to port 80 on the selected pods, enabling external access to the nginx application running within the Kubernetes cluster.
To deploy, simply run:
kubectl apply -f nginx-deployment.yaml -f nginx-service.yamlThat’s it! Your Nginx app is now up and running on your AWS EKS cluster.
3. Accessing Your Nginx App
Here comes the moment to observe the handiwork in action. First, fetch the external IP address of the LoadBalancer Service.
To do that we have to run the following command:
kubectl get services nginx-serviceLook for the EXTERNAL-IP column, that’s the Public IP address which will have an IP address or load balancer’s address you can use to access your Nginx app in a web browser.
Alternatively, you can directly launch the app Nginx in your default browser from the application itself by running this command (this will work only if you are using AWS CLI from your desktop/laptop and running with a MAC or Linux operating system; it won’t work if you are using AWS Cloudshell):
kubectl get service nginx-service --output='jsonpath={.status.loadBalancer.ingress[0].hostname}' && open http://$(kubectl get service nginx-service --output='jsonpath={.status.loadBalancer.ingress[0].hostname}')And there you have it, your very own Nginx app, proudly running on AWS EKS!
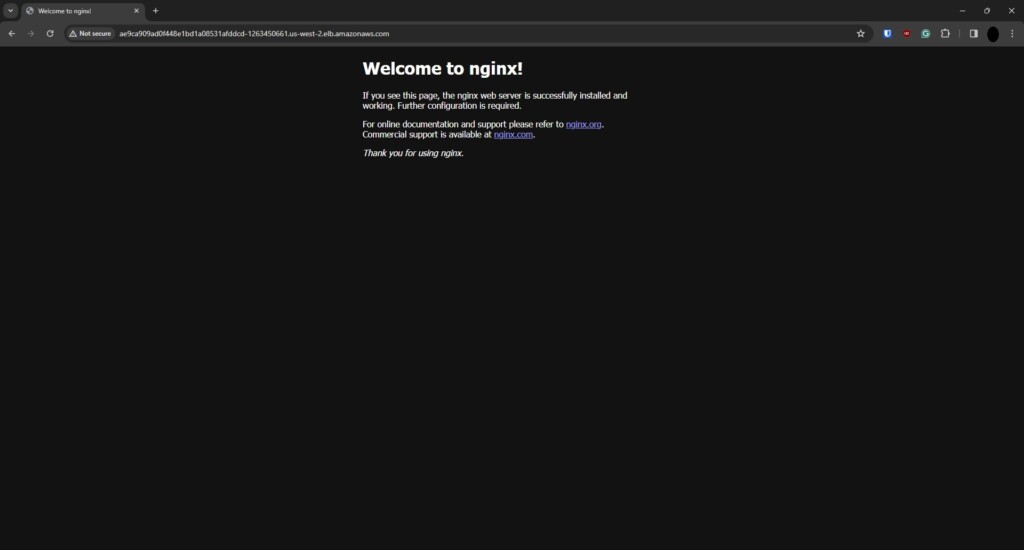
When you open your browser with that EXTERNAL-IP you can see something like this in your browser:
4. Clean UP (Optional)
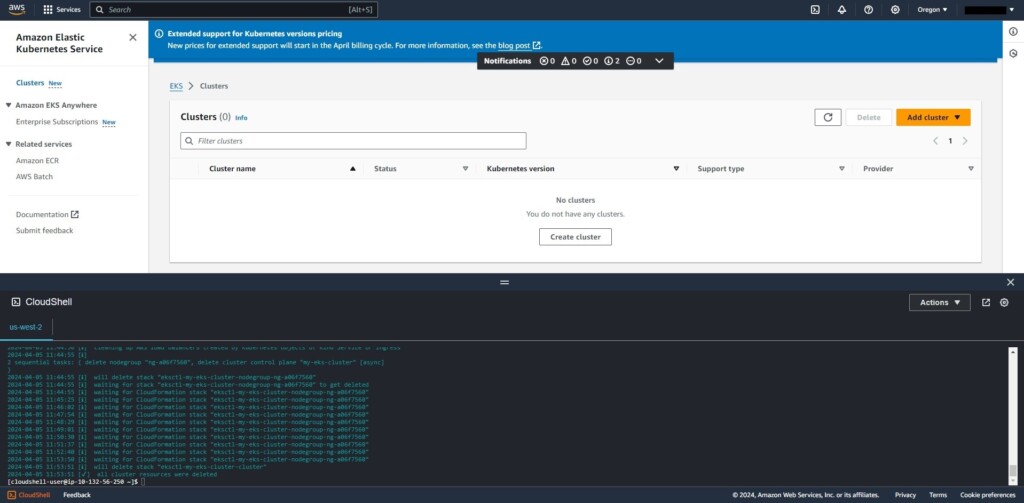
After completing the testing of the first Nginx deployment, delete the EKS cluster to avoid unexpected billing from AWS. Execute the following command:
eksctl delete cluster --name my-eks-clusterWhen you delete it you will see a screen like this:
Conclusion
In this blog, the basics of deploying a simple Nginx application on EKS AWS were explored. This involved creating an EKS cluster, deploying the application with the Kubernetes resources of Deployment and Service, accessing it through the LoadBalancer Service, and finally deleting the cluster.
However, this only scratches the surface of what is possible with EKS. As you gain proficiency in Kubernetes and EKS, you can easily explore deeper into more advanced features: like Nginx API gateway set utilizzation, autoscaling, ingress controllers, and persistent volumes to upgrade deployment strategies.
Ready to get started? Activate your AWS account and begin experimenting with EKS! If challenges arise or guidance is needed, the vibrant Kubernetes community is always available for support.For more such guides and knowledgeable and informational blogs, refer to our CloudZenia website and learn more about AWS and cloud technology.